


Creating beautiful DIY Christmas centerpieces for your holiday table doesn’t have to be expensive or complicated. With greenery, candles, ornaments, seasonal fruit, and a few simple containers, you can create a festive display using materials you may already have at home.
These ideas range from traditional fruit-and-floral arrangements to simple Scandinavian garlands, glowing mason jars, rustic ornament bowls, and elegant cranberry displays. Each option can be adapted to suit your table size, decorating style, and budget.
Transform Your Holiday Table with Budget-Friendly DIY Christmas Centerpieces
Homemade Christmas table decorations add personality and warmth to a holiday gathering. You don’t need professional decorating skills or expensive supplies to create an attractive centerpiece. A little creativity and a few versatile materials can completely change the look of your dining table.
Why Handmade Centerpieces Make the Perfect Holiday Statement
Handmade centerpieces bring a personal element to your holiday decor. They can also become conversation starters when guests notice the details and ask how you created them.
Because you control the colors, textures, and materials, DIY arrangements can easily be customized to match your existing Christmas decorations.
Essential Materials You’ll Need for Most Projects
Keep a selection of versatile supplies available for different centerpiece projects:
- Floral foam or chicken wire
- Fresh or faux evergreen branches
- Candles in different sizes
- Ribbon and twine
- Wire cutters and a hot glue gun
- Seasonal fruits and pinecones
- Glass containers or wooden trays
Buying multipurpose supplies can help reduce costs because many of these materials can be reused for several arrangements.

Vintage-Inspired Fruit & Floral Arrangement
A vintage-inspired arrangement combines seasonal fruit, flowers, and greenery for a traditional holiday appearance. Deep colors and natural textures give this centerpiece a rich, old-fashioned character.
Materials Needed for Your Vintage Display
- Vintage-style ceramic compote, wooden box, or decorative bowl
- Floral foam
- Pomegranates, pears, small apples, and citrus
- Seasonal roses, carnations, or chrysanthemums
- Eucalyptus, ivy, or fern greenery
- Floral wire and wooden picks
- Cinnamon sticks, dried orange slices, or velvet ribbon
Step-by-Step Assembly Instructions
If you’re using fresh flowers, soak the floral foam before securing it inside your container. Begin by positioning the largest fruits so the arrangement has a balanced foundation.
Add greenery at different angles to create depth, then fill the open spaces with flowers. Finish with smaller fruits and decorative accents, allowing a few pieces to extend naturally beyond the container.
Styling Tips for an Authentic Vintage Look
Use rich shades such as burgundy, forest green, and antique gold. Mixing glossy fruit with matte greenery creates additional texture.
Dried elements, silvery foliage, and slightly overflowing fruit can give the arrangement a relaxed, traditional appearance.
Evergreen & Candle Tray Centerpiece: Classic Elegance Made Simple
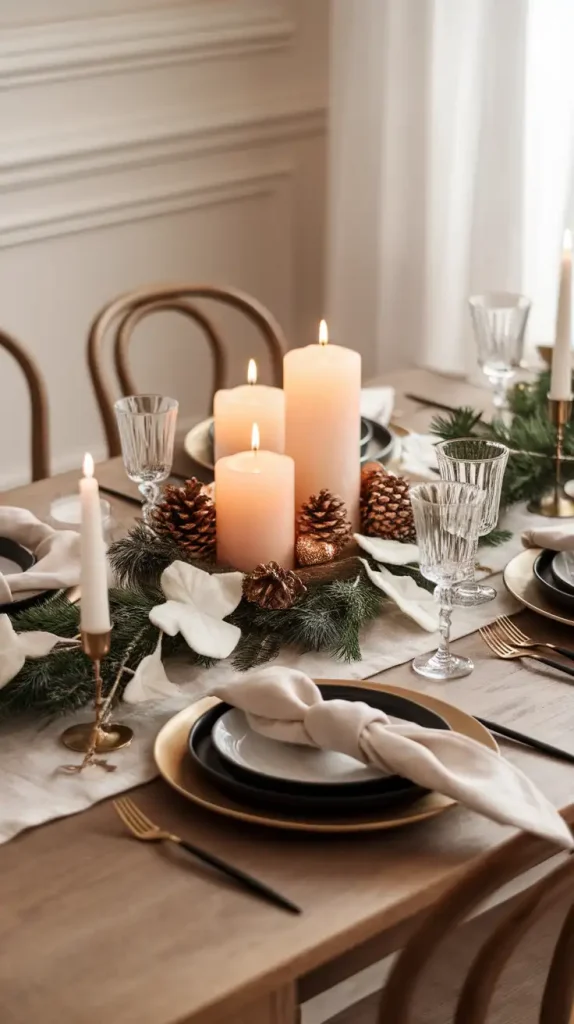
An evergreen and candle tray is one of the easiest ways to create a classic Christmas centerpiece. Fresh pine, fir, cedar, or spruce adds seasonal greenery and fragrance, while candles create a warm atmosphere.
Gathering Your Evergreen Materials and Selecting the Perfect Tray
Choose full, healthy evergreen branches from your yard or a local store. For the base, select a container that complements your decorating style.
Wooden trays create a rustic look, while silver, gold, galvanized metal, or white ceramic can produce a more polished appearance.
Arranging Your Tray Display for Maximum Impact
Lay the greenery along the length of the tray to form a lush foundation. Arrange the branches so they overlap slightly and leave enough room for your candles.
Creating Visual Balance with Greenery Placement
Spread the greenery evenly and vary the direction of the branches. Tuck some stems underneath others to create depth while keeping the arrangement open enough for candles.
Choosing the Right Candle Heights and Colors
Use candles in three different heights to create visual variety. White and cream are timeless choices, while burgundy and green add stronger Christmas color.
Metallic gold or silver candles can provide a more modern finish.
Candle Safety and Placement Tips
Keep burning candles several inches away from greenery and place them on heat-resistant surfaces. Never leave lit candles unattended.
For homes with children or pets, flameless LED candles are a safer alternative while still providing a warm glow.
Mason Jar Luminaries with Epsom Snow: Magical Winter Glow
Mason jar luminaries combine soft candlelight with a frosted winter appearance. They are inexpensive, simple to make, and can work beautifully as individual decorations or as part of a larger table display.
Creating the Frosted Snow Effect on Your Jars
Start with clean, completely dry mason jars. Wipe them with rubbing alcohol and allow them to dry before applying any decorative coating.
Applying Epsom Salt for a Realistic Snow Coating
Place Epsom salt in a shallow dish. Brush the outside of the jar with craft glue or Mod Podge, then roll it through the salt until you achieve the desired snowy texture.
A light layer creates subtle sparkle, while a thicker coating produces a heavier frosted effect.
Alternative Frosting Techniques You Can Try
You can also experiment with spray snow, white paint mixed with baking soda, or white glue combined with glitter.
Adding Tea Lights or LED Candles Safely
LED candles are the safer choice for these jars because they produce little heat. If using traditional tea lights, use appropriate holders and handle the glass carefully.
Grouping and Display Ideas for Your Table
Arrange the jars in groups of three, five, or seven for a more balanced display. Add pinecones, greenery, or cranberries around the bases for additional texture.
Create Stunning DIY Christmas Centerpieces for Table with Minimalist Scandinavian Garland
A Scandinavian-inspired garland brings a clean, natural look to the holiday table. Instead of filling the table with decorations, this design uses greenery, pinecones, candles, and subtle neutral accents.
The finished garland works like a natural table runner while leaving plenty of space for food and conversation.
Selecting Natural Elements for Your Garland
Fresh greenery creates the foundation. Choose branches that maintain their appearance throughout the celebration.
Best Greenery Options for a Scandinavian Look
Eucalyptus offers a soft silvery-green color and can dry beautifully. Olive branches, pine boughs, and dusty miller are other suitable choices.
Pine provides a traditional Christmas appearance, while olive branches and eucalyptus create a softer, more understated effect.
Adding Eucalyptus and Pinecones for Texture
Use pinecones in different sizes to create natural variation. Their warm brown color works particularly well with neutral Scandinavian decor.
For a frosted appearance, pinecones can be prepared in advance and incorporated carefully into the arrangement.
Building Your Table Runner Garland Step by Step
Lay your greenery along the center of the table, overlapping stems slightly as you work from one end to the other.
Place pinecones between the branches and add small candles in clear glass holders. Wooden beads or neutral felt decorations can provide subtle accents without making the garland look crowded.
Adding Simple Decorative Touches Without Overwhelming the Design
Keep the design restrained. Small white candles, natural wood pieces, and soft greenery are enough to create an elegant Scandinavian atmosphere.
Avoid excessive metallic decorations or busy patterns if you want to maintain the clean, organic appearance.
Rustic Bowl of Ornaments & Greens: Effortless Farmhouse Charm
A rustic bowl filled with ornaments and evergreen branches is a quick way to create a cozy farmhouse centerpiece. It requires only a few materials and can be assembled in minutes.
Choosing the Right Bowl and Ornaments for Your Style
Choose the container according to your table size. Larger tables can handle a substantial bowl, while smaller tables look better with a compact arrangement.
Wooden Bowls vs. Metal Containers
Weathered wooden bowls bring warmth and farmhouse character. Galvanized metal containers or vintage enamelware offer a more industrial or traditional appearance.
Mixing Matte and Glossy Ornament Finishes
Combining matte and glossy ornaments gives the arrangement more depth. Matte finishes feel softer and handmade, while glossy ornaments provide sparkle.
Layering Ornaments with Natural Greenery
Begin with ornaments in different sizes, leaving small spaces between them. Tuck pine, cedar, or eucalyptus sprigs around the ornaments.
Pinecones, cinnamon sticks, and berry picks can add more texture and a subtle seasonal fragrance.
Color Coordination and Texture Tips for a Cohesive Look
Traditional red, green, and wood tones create a classic Christmas palette. For something more elegant, try white and silver with evergreen.
Navy, copper, cream, and ivory can give the arrangement a modern rustic appearance.
Mix smooth ornaments with rough pinecones and soft greenery to make the display look fuller and more dimensional.
Cozy Cottagecore Candle Cluster: Romantic Candlelight Ambiance
A candle cluster creates a warm, intimate atmosphere that works particularly well for long Christmas dinners. Combining candles with greenery and soft florals gives the table a relaxed cottagecore character.
Selecting Candles in Various Heights and Widths
Use candles with different heights to create visual movement. Combine tall taper candles with shorter votives and chunky pillar candles.
Varying the widths also keeps the display from looking too uniform.
Choosing Complementary Candle Colors
Cream, ivory, and white provide a timeless look. For softer color, combine blush, sage, and warm cream.
Gold or champagne candles can add a subtle festive glow without overpowering the natural elements.
Mixing Pillar and Taper Candles Effectively
Place tall taper candles in decorative holders and surround them with medium-sized pillar candles. Add small votives around the base for additional layers of light.
Creating a Focal Point with Florals and Greenery
Position the candle arrangement slightly off-center for a more natural appearance. Add soft flowers such as roses or white blooms and weave eucalyptus or ivy between the candles.
Building Dimension with Layered Elements and Natural Accents
Elevate a few candles using small wooden boxes or decorative books to create different levels.
Seasonal fruit, moss, river stones, vintage lace, or small natural accents can add texture without making the display feel cluttered.
Glass Vase with Floating Cranberries & Candles: Fresh and Festive
A glass vase filled with cranberries, water, and floating candles creates a bright and festive Christmas centerpiece. The transparent container allows the arrangement to look attractive from every side.
Preparing Your Vase and Materials for Success
Cylinder vases provide a clean, modern appearance, while hurricane vases offer a more traditional look.
Choose a container that fits the size and shape of your table. Wider vases work well for longer tables, while smaller clear bowls can be used for compact displays.
Fresh vs. Frozen Cranberries: What Works Best
Fresh cranberries are generally the better option because they maintain their color and appearance longer.
Frozen cranberries can become soft as they thaw and may discolor the water, which can affect the finished display.
Achieving the Perfect Floating Effect with Your Candles
Fill the vase about two-thirds with room-temperature water. Add cranberries and then carefully position floating candles on the surface.
White or ivory candles create a classic contrast with the red cranberries, while gold accents can add extra holiday sparkle.
Always monitor burning candles and keep them away from drafts or anything flammable.
Keeping Your Water Display Fresh Throughout the Holidays
Change the water every few days to prevent cloudiness. Remove cranberries that become damaged or sink.
Keep the arrangement away from direct sunlight and heating vents. For an extra decorative touch, add rosemary, eucalyptus, or submerged fairy lights.
Conclusion
DIY Christmas centerpieces are an easy way to make your holiday table feel more personal and festive. From vintage fruit arrangements and evergreen candle trays to Scandinavian garlands, rustic ornament bowls, and floating cranberry displays, there are plenty of options for different decorating styles.
You don’t need to create the most complicated arrangement to make an impression. Start with a simple project that fits your table and available materials, then experiment with colors, textures, greenery, candles, or ornaments.
The best centerpiece is one that makes your dining space feel warm and welcoming. Gather a few basic supplies, choose your favorite design, and create a Christmas table that feels uniquely yours.


